Layouts are an excellent way to standardize your forecasting process. Layouts allow you to save and return to setting and window view configurations. If you set up your forecasting process with layouts, you can easily access the key information you need each time you update your project. Please consult the Working with Layouts section of the Advanced Navigation lesson and the Touring the Five Reports section of the Exception Reporting lesson in Forecast Pro TRAC Tutorials for more details on using layouts.
To make a layout, you first create a project view that you find useful. For example, you may want to have a graph view and an item report filtered to products with less than 12 periods of history. If you are using monthly data, this view will show you all items with less than a year of history. You can view each item in the graph by double clicking on each item in the item report list. Next, you will want to save that view as a layout.
Layouts are managed from the Home tab.

Adding Layouts
The ![]() icon opens the Add Layout dialog.
icon opens the Add Layout dialog.

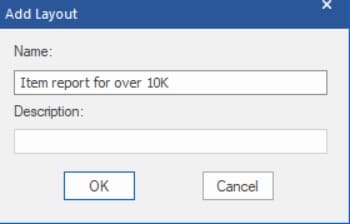
To add a layout, simply enter a layout name, a description (if desired) and click OK. If you click on the Layouts drop-down list on the Home tab or Quick Access Toolbar, you will now see your saved layout included. If you select your layout from the drop-down menu, Forecast Pro will display the view and setting configurations as saved in the selected layout.
Managing Layouts
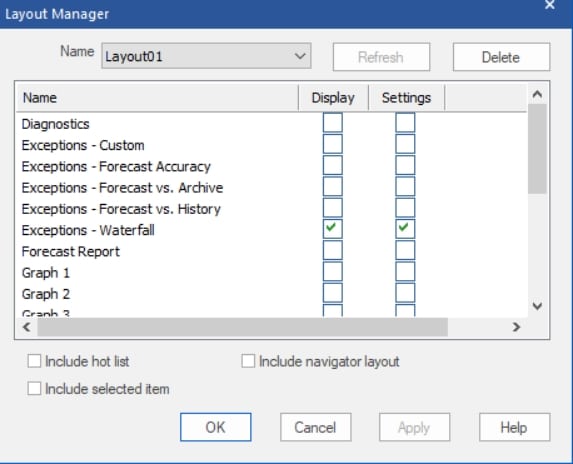
The Layout settings can be configured by clicking the Manage Layout icon (![]() ) to open the Layout Manager dialog box. Note that at least one layout must exist for this dialog to be available.
) to open the Layout Manager dialog box. Note that at least one layout must exist for this dialog to be available.

Name: This drop-down shows four Layout commands, New, Rename, Save As and Delete, as well as the layouts that have been saved to the current project. The drop-down displays the currently selected layout.
New: Opens the Add Layout dialog box described above.
Rename: Opens the Rename Layout dialog box where you can enter a new name.
Save As: Opens a Save As dialog box that will take the settings for the selected layout, along with any changes you have made in the Layout Manager dialog and create a new layout with the specified name.
Delete: Removes the selected layout from the current project.
Update: The Update button updates the currently selected layout with specified changes.
Delete: The Delete button removes the selected layout from the current project.
Display: The Display column allows you to specify, for each Forecast Pro view, if you want the selected layout to save display and/or settings configurations for the selected view. Display settings include view window status (open, closed etc.) and view location, while settings include anything that is specified in the view’s Setting dialog box. Display is checked for all views that should be shown in the layout. If a view has Settings checked but not Display, Forecast Pro will load the settings as specified in the layout but not open the view window. This may be useful if you want to export reports with saved settings, but you do not want to view the Report in Forecast Pro.
Include hot list: Check this if you want the layout to save hot list items, so that when the layout is selected the hot list displays those saved items.
Include selected item: Check this if you want the layout to associate the item selected on the Navigator with the layout.
Include navigator layout: Check this if you want the layout to save the Navigator layout (e.g. which nodes are open) and update the Navigator when you select the layout.
Layouts may be removed and refreshed directly from the Home tab using the remove layout icon (![]() ). Clicking on the Remove icon opens the Remove Layout dialog box. Simply select the layout you want to remove and click OK to remove a layout from the Layouts drop-down and the current project.
). Clicking on the Remove icon opens the Remove Layout dialog box. Simply select the layout you want to remove and click OK to remove a layout from the Layouts drop-down and the current project.
Layouts may also be updated directly from the Home tab with the Update icon (![]() ). Click the Update icon to launch the Update Layout dialog box. Selecting a layout in the dialog box and clicking OK will replace the selected layout with the current Forecast Pro view and settings.
). Click the Update icon to launch the Update Layout dialog box. Selecting a layout in the dialog box and clicking OK will replace the selected layout with the current Forecast Pro view and settings.

