Forecast Pro TRAC only
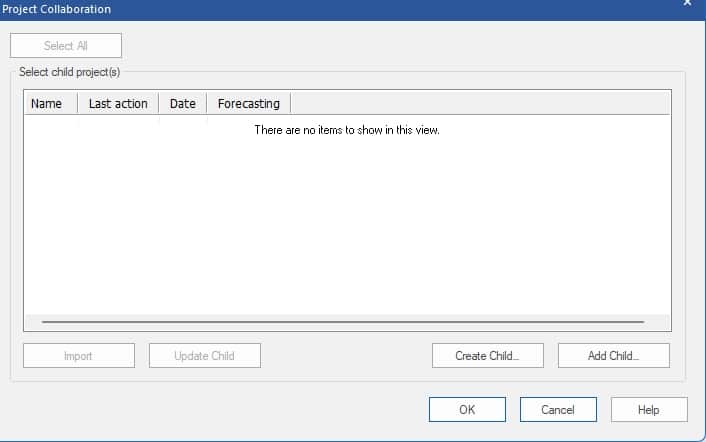
Click the Project Collaboration icon on the Home tab to open the Project Collaboration Manager. Note that you must save all pending changes to your project and your project must be in its default hierarchy and units to use the Project Collaboration manager.

All child projects associated with the project will be listed in the Select child project(s) display. When you first start a project, this list will be blank, and you will probably want to create new child projects. To create and add a project to the list, click the Create Child… button to open the Create dialog box.

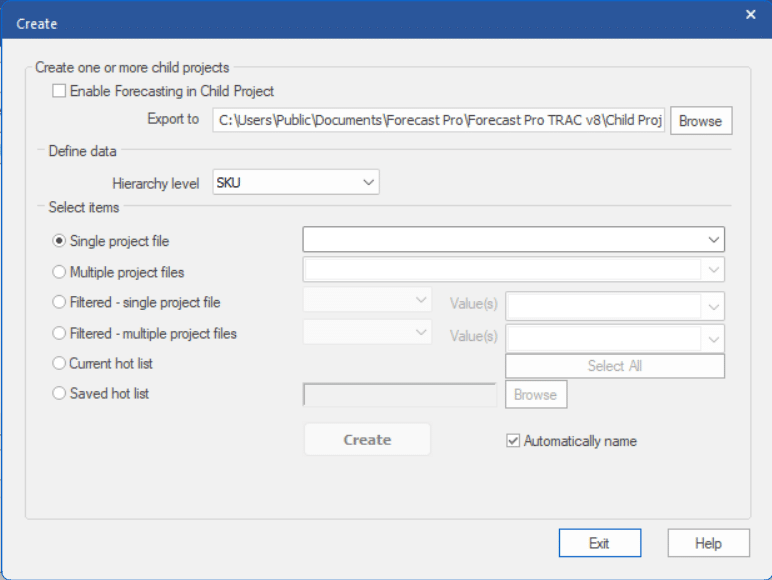
Create one or more child projects:
Enable Forecasting in Child Project: Check this box if you want to allow the child project to generate new baseline forecasts. Checking this box allows the child project user to generate statistical forecasts, which are then typically used as baseline forecasts, in the child project. Note that the child project must be opened with a Forecaster license to generate new statistical baseline forecasts. When the child project changes are imported to the parent, the parent project will import and apply the child project’s baseline forecasts for all child project items.
Export to: This text field specifies where you want to save your child projects. By default, collaboration sheets are saved in “C:\Users\Public\Documents\Forecast Pro\Forecast Pro TRAC v8\Child Projects”.
Define Data
Hierarchy level: This drop-down specifies the level at which you want to “split” the parent project into child projects. If you select the end-item level, you will select end-items to include in a child project and forecasting and/or override capabilities will only be allowed at the end-item level. If you select a higher hierarchy level, you will select groups to include in the child project(s). The child project will then include all end-items associated with the selected group(s) and allow forecasting and/or overrides to be made at the selected group level or below (including end-items).
Select Items
There are six options for assigning items at your selected hierarchy level to child project(s).
Single project file: Select this option if you want to create a single child project containing the groups or end-items selected in the accompanying drop-down. Select the drop-down and check the items you want to include in the child project and then select Create to generate your child project.
Multiple project files: Select this option if you want to create a child project for each item selected in the accompanying drop-down. Using this option typically makes sense if you are “splitting” the parent into child projects at a relatively high level in the hierarchy. If the “Automatically name” checkbox is selected, Forecast Pro will automatically create child projects in the “Export To” folder.
Filtered – single project file: Select this option if you want to create a single child project containing items with specific filter values. To use this option, first select the filter you want to use to select items and then select the specific filter values to apply. Forecast Pro will then create a single child project containing all items with the selected filter value(s). Please note that the selected filter should be defined at the selected Hierarchy level. Otherwise, the child project will not contain any items.
Filtered – multiple project file: Select this option if you want to create a child project for each filter value selected in the Value(s) drop-down. To use this option, first select the filter you want to use to select items and then select the specific filter values to apply. Forecast Pro will then create multiple child projects, each containing items with the filter value(s) selected. Please note that the selected filter should be defined at the selected Hierarchy level. Otherwise, the child project(s) will not contain any items.
Current hot list: Export items with the selected hierarchy level on the current hot list. This option is only available if you have a hot list currently defined.
Saved hot list: When working with hot lists, you can save a hot list using the Hot list icon in the Other Group on the Export tab or by selecting Save Hot list on the Hot List context menu. These files will contain a list of the items on the hot list. You can select a saved hot list by clicking the browse button and selecting the file.
Automatically name: If selected, Forecast Pro will automatically name and save the project files to the folder location defined in the Export to text box.
Create: The Create button is used to generate the child project(s) as specified. If you are using Multiple project files or Filtered – multiple project file and Automatically name is checked (see below), Forecast Pro will automatically save the project files to the folder location defined in the Export to text box and display the child projects in the Select project(s) to update display. In all other cases, you will be prompted to save each child project with a user specified name and location.
Once you have created your child project(s), Forecast Pro will automatically close the Create dialog and return to the Project Collaboration Manager.

