Event models extend exponential smoothing by allowing you to adjust for events like sales promotions, strikes or simply for unexplained outliers. Multiple events are used to account for promotions of different types or sizes, different calendar effects like Easter and Independence Day weeks, or any other “out of the ordinary” occurrence.
To build an event model, you must tell the program when events of each type occur. To do this, you must construct an event schedule which classifies each period by event code (0=no event, 1=event of type 1, 2=event of type 2, etc.). You can create event schedules interactively using the Event Manager or create them outside of Forecast Pro and import them using the Helpers row in the Data Manager. When you create an event schedule interactively, Forecast Pro will create a helper variable with this schedule.
The Event Manager
The Event Manager is used to create and modify event schedules. This section documents the options available on the Event Manager dialog boxes.
You invoke the Event Manager by clicking the Events icon on the Forecasting tab or selecting Manage events on the Graph 1 view’s context menu.

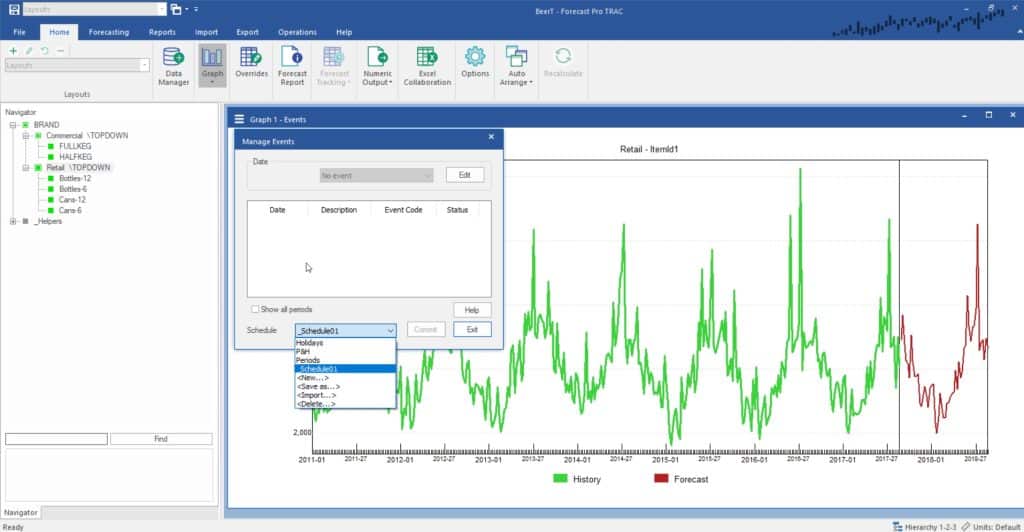
The Event Manager works in conjunction with the Graph 1 view. If the Graph 1 view is not open, Forecast Pro will automatically open it when you click the Event icon on the Forecasting tab.
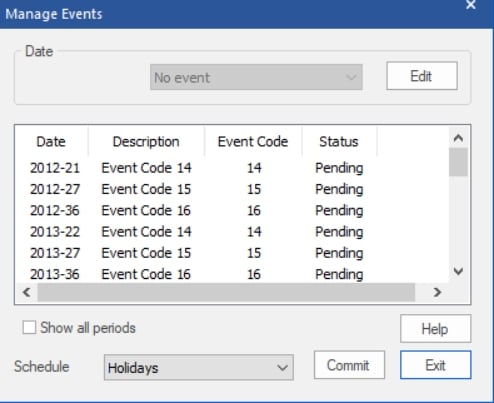
The Manage Events dialog box is shown above. The Date drop-down at the top of the box is used to assign event codes to the current schedule. To specify the date to which you want to assign an event code, you select a historic point on Graph 1. You can then use the drop-down to the right of the date to associate the selected date with a specific event. Holding down the <Ctrl> key when selecting points on the graph allows you to select multiple points.
The display grid in the middle of the dialog box shows the event code definitions on the current schedule along with their status. Pending status indicates that the changes are not yet reflected in the current forecast model. Clicking the Commit button will accept the current changes and build the specified event model.
The Show all periods checkbox will include all periods in the display grid, not just the dates with assigned events. You may select periods in the display grid and use the drop-down to assign event codes instead of selecting periods on the graph.

The Schedule drop-down is used for several purposes. When the drop-down is closed it displays the name of the event schedule associated with the current item. Opening the drop-down displays the currently available event schedules and allows you to select one. It also provides options to disassociate the currently selected schedule from the currently displayed item and create a new schedule (New), rename the current schedule (Save as), import events from other schedules into the current schedule so the two schedules are merged and delete the current schedule from the project.

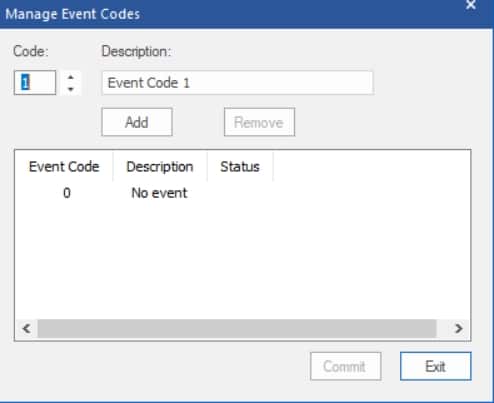
Clicking the Edit button on the Event Manager or using the Event Codes option in the Events icon drop-down will invoke the Manage Event Codes dialog box shown above, which allows you to define new event codes and edit existing ones. You can select an event code using the spinners or by clicking on the event code in the display grid. After editing a description, you click the Add button to update the display grid. You can remove an event code by selecting it in the display grid and clicking the Remove button. You will be warned if the event code is being actively used and given the option to save changes to the event codes. Any new event code defined will have a status of Pending until you accept them using the Commit button. The Exit button is used to close the Manage Event Codes dialog box and return to the event manager.
Finally, the Events icon drop-down lists the event schedules associated with the project. Select a schedule from the drop-down to apply the modifier \EVENT=_X, where X is the selected schedule or helper, to the selected item on the Navigator. Note, the drop-down will only list up to 10 event schedules. You can click Select… to view all event schedules and specify a schedule to apply to the selected item on the Navigator.
For examples of constructing event variables and building event models, consult the Building Event Models Tutorial. For statistical details, consult the Forecast Pro Statistical Reference Manual.
The following modifiers are used for Event Models:
- \EVENT=X: Use an event model with helper X.
- \EXSM=XYZ: Use an exponential smoothing model with trend type X (N=no trend, L=linear trend, D=damped trend, E=exponential, *=Forecast Pro decides), seasonality type Y (N=nonseasonal, M=multiplicative seasonal, A=additive seasonal, *=Forecast Pro decides) and event type Z (M=multiplicative, A=additive, *=Forecast Pro decides). This modifier can only be used in conjunction with \EVENT=X.
- \XYZ(A,B,C,D,E): Use an exponential smoothing model with trend type X (N=no trend, L=linear trend, D=damped trend, E=exponential, *=Forecast Pro decides), seasonality type Y (N=nonseasonal, M=multiplicative seasonal, A=additive seasonal, *=Forecast Pro decides), event type Z (M=multiplicative, A=additive, *=Forecast Pro decides) and user defined smoothing weights (A=level, B=trend, C=damping/growth, D=seasonal, E=event). This modifier can only be used in conjunction with \EVENT=X.

