The custom component model includes each of the components found in a custom exponential smoothing model: level, trend, seasonality and events. In a standard smoothing approach, final values of each component are estimated from the data and used to assemble the forecasts. In a custom component model, you can either let Forecast Pro estimate the final value for a given component or customize the values to be used.
Custom component models are useful in a variety of situations including (1) customizing the trend for longer-term forecasts, (2) customizing the seasonal pattern for short data sets and (3) defining the impact of future events that have not occurred historically. Because custom component models are particularly useful for new products, Forecast Pro includes a Custom Component icon in the New Product group in addition to the primary icon on the Forecasting tab.
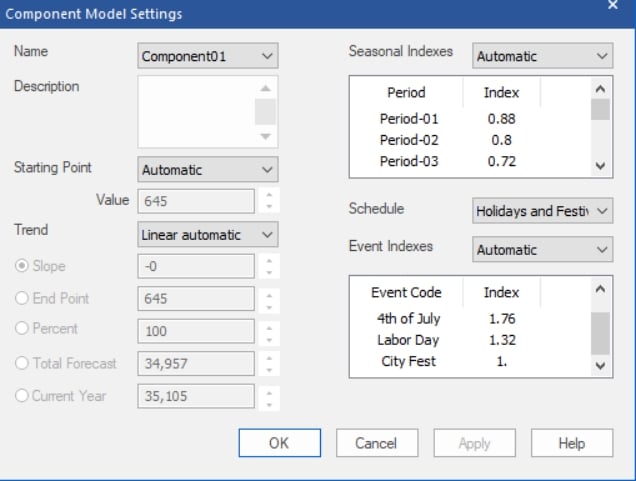
Clicking either Custom Component icon or selecting Forecasting > Component Model > Manage on the Navigator context menu invokes the Component Model Settings box shown below.

Name: Forecast Pro names each of your component model specifications and saves them in the project. These named specification sets provide a convenient way to apply the same component model specifications to multiple items on the Navigator. The Name drop-down allows you to select previously defined specification sets, create new ones, save the current set using a different name and delete the current set.
Description: The Description field allows you to enter a description for the current specification set.
Starting Point: The Starting Point drop-down allows you to set the starting point for the forecasts. Automatic instructs Forecast Pro to estimate an exponential smoothing model for the data and set the starting point to the final level. Custom allows you to enter a specific value to use as the starting point. Final Historic sets the starting point to the final historic observation.
Trend (None and Linear): The Trend drop-down allows you to specify the form of the trend you wish to forecast. All trends will begin at the starting point. None will yield a flat-line trend. Linear automatic instructs Forecast Pro to estimate an exponential smoothing model for the data and set the trend to the final trend estimated for the model (this will either be linear or flat line). Linear custom will default to the linear automatic value, but the slope can then be modified using the radio buttons (discussed below).
Trend (Bent): You can modify a linear trend by “bending” it up or down. When you bend a trend downward you decrease the per-period-slope increment resulting in a trend that dampens out as you forecast forward. When you bend a trend upward you increase the per-period-slope increment resulting in a trend that accelerates as you forecast forward. Bent automatic will use the linear automatic trend as the baseline which can then be bent using the radio buttons (discussed below). Bent custom will default to using the linear automatic trend as the baseline but allows you to change the slope for the baseline trend (using the Slope radio button) as well as allowing you to bend the baseline trend using the radio buttons (discussed below).
Trend (radio buttons): The Trend radio buttons are used to customize the slope. When the Component Model Settings dialog box is open, the graph includes the current committed trend. The Slope allows you to modify the slope (per-period change) directly. The End Point allows you to set the value of the trend at the last forecast point. The difference between the trend’s starting point and ending point can be thought of as the “vertical rise.” Percent allows you to specify the ending point of a bent trend model as a percentage of the vertical rise. Total Forecast allows you to set a value for the sum of the total forecast. Current Year allows you to set a value for the sum of the current year’s historic + forecast values.
Seasonal Indexes: The Seasonal Indexes drop-down allows you to specify the multiplicative indexes you wish to use to forecast the seasonality. None will yield a nonseasonal forecast. Automatic instructs Forecast Pro to estimate an exponential smoothing model for the data and set the seasonal indexes to the final seasonal indexes estimated for the model. Custom allows you to edit the currently displayed values. Helpers allow you to import the indexes from a helper variable. If the helper variable contains more than one year’s worth of indexes, Forecast Pro will import the final year’s values.
Schedule: The Schedule drop-down allows you to specify an event schedule to use.
Event Indexes: The Event Indexes drop-down allows you to specify the form and values for the event indexes. None will not apply event indexes to the forecast. Automatic instructs Forecast Pro to estimate an exponential smoothing model for the data and set the event indexes to the final event indexes estimated for the model. Custom additive allows you to edit the currently displayed values and apply them as additive indexes. Please note that the displayed values may correspond to a multiplicative model and, if so, should be changed to values that reflect incremental units driven by each event code. Custom multiplicative allows you to edit the currently displayed values and apply them as multiplicative indexes.
Click OK or Apply on the Component Model Settings dialog box to apply the model shown in the name drop-down to the item selected on the Navigator. Alternatively, you may open the drop-down on the large Custom Component icon on the Forecasting tab and select a model name.
- \COMP=name is the modifier to apply a custom component model with the specifications defined in name.

