Forecast Pro TRAC only
The Forecast Pro Excel Add-in will not be accessible in Excel until you start Forecast Pro. Please start Forecast Pro to automatically activate the add-in. If you start the program with Excel open, you will need to close and re-open Excel for the add-in to be activated. If the add-in is not running, you will see instructions in the collaboration sheet for how to proceed. Please note that the Forecast Pro Add-In will not run if you do not have a licensed Forecaster or Collaborator edition of Forecast Pro installed.
If the add-in is properly installed and running, the collaboration sheet is populated with your data when you open it in Excel. The Forecast Pro Add-In interface varies for the two built-in templates, In Place and By Selection.
In Place Collaboration Sheets
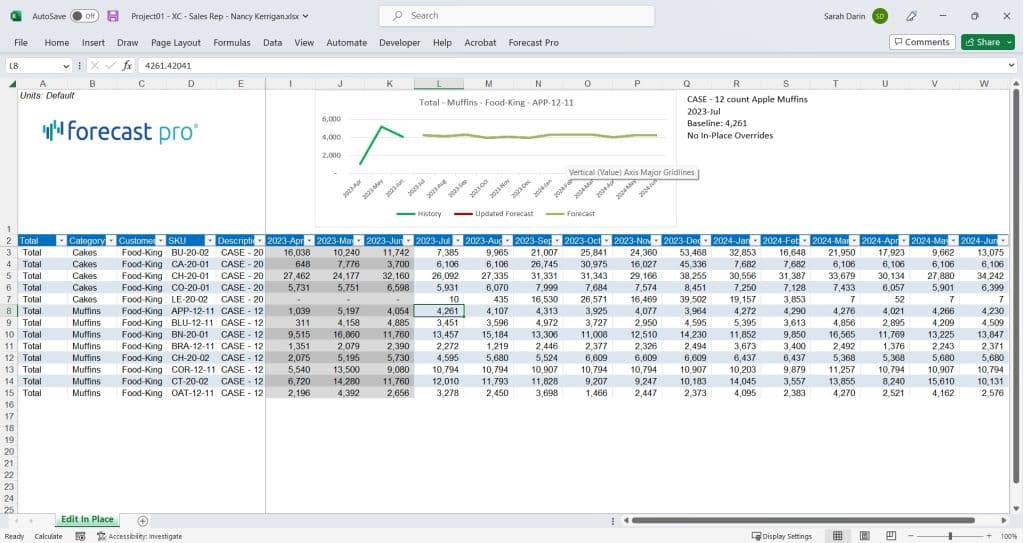
The In place template will render a collaboration worksheet like the one shown below

The In Place collaboration worksheet includes all items selected for export in the Excel Collaboration dialog box. The columns on the left show the hierarchy attribute values for each item. You may use the Excel filters to display subsets of the hierarchy. The gray columns show the exported history. In this example, three months of history were exported by setting the left date spinner to -3. Finally, the columns to the right of the history columns show the forecast values. In this case, the right date spinner in the Excel Collaboration dialog box was set to 12, specifying that 12 forecast periods should be exported.
The order of the attributes reflects the hierarchy associated with the collaboration file. The unit measure associated with the collaboration sheet is displayed in cell A1. Changes to the collaboration sheet shown above should use the “Default” units. These are both defined in Forecast Pro before the creation of the collaboration file.
Please note that the attributes and historic data cells are not editable. Only the forecast values may be updated. You may also use the empty cells to the right of forecast values as well as the rows below the exported item rows.
The graph displays the history and forecasts for the item associated with the selected row. Text to the right of the graph will display overrides and comments that existed in the project at the time of export for the selected cell.
To edit a forecast value, simply enter the override value in the selected cell. When you change a value, the cell will turn orange to indicate that a change has been made.
The Forecast Pro Add-In also edits the cell context menu to disable certain functionality that is not available in the collaboration sheet (e.g. inserting rows or columns) and to include Add-In functionality. The cell context menu is opened by right clicking on a cell. You can add, edit and delete comments from the context menu as well.
When you are done editing, simply save the Forecast Pro collaboration sheet. When the collaboration sheet is read into the Forecast Pro project, all overrides and comments will be imported into the project.
Collaboration sheets include a custom Forecast Pro ribbon tab. This tab includes the following functionality:
Edit Forecasts:
The functionality in this group is used to efficiently make changes over multiple cells. To start, select all the forecast cells that you want to edit. You may select cells across different forecast periods and items. If you want to adjust the selected cells by a certain percentage, enter the percentage in the Percent edit box and click the Percent button. If you want to adjust each selected point by a certain increment, enter the increment in the Increment edit box and click the Increment button. If you want to change the sum of the selected points to a defined value, enter the value in the Value edit box and click the Value button.
Comments:
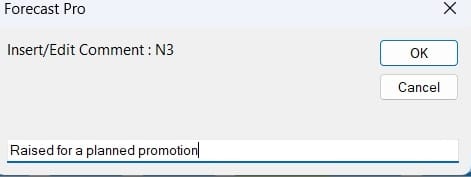
Insert/Edit Comment: Overrides should always be accompanied by a comment documenting why the override was made. To enter override comments that will be imported into a Forecast Pro project, select the cells to which the comment should apply and then click the Insert/Edit Comment button to open the following dialog box.

The textbox shows the existing comment, if any. Enter or update the comment in the text field and click OK. Once a comment has been written, you will see a red triangle in the upper right-hand corner of each selected cell. If you hover over a commented cell, you will see the comment.
Delete Comment: Click this button to remove the comment(s) from the selected cell(s).
Restore:
Click this button to restore the exported forecast value in the selected cell(s).
View:
Description: Check Description if you want to include the item description.
Filters: Check Filters if you want to include filter columns in the display.
Sort: Click this icon open the Sort dialog, where you can use Excel’s built in sort functionality to sort all exported items and columns.
About Forecast Pro:
Click this button to open a dialog box that displays information about the Forecast Pro Add-In you are running.
By Selection Collaboration Sheets
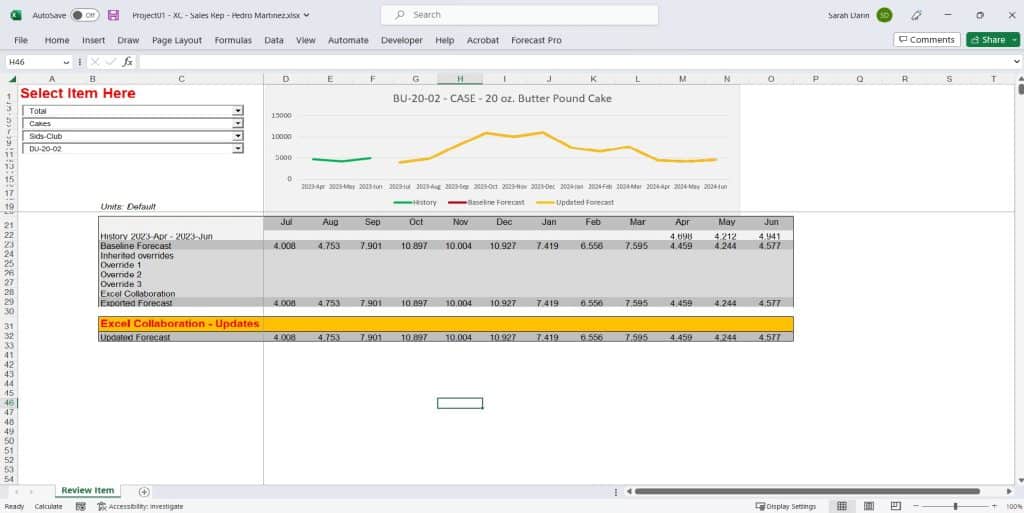
If you use a By Selection template, the collaboration sheet will look similar to the override grid view in Forecast Pro.

On the left hand side, there will be a drop-down for each attribute in your hierarchy. The attributes are ordered using the project hierarchy that was defined when the collaboration sheet was created. The drop-downs are used to select the item to display in the graph and grid. The currently selected item is displayed on the graph. Above the override grid, the collaboration sheet includes the unit measure that is associated with the collaboration sheet. All changes should be made in this unit measure.
The override grid shows the Baseline Forecast, all override rows (with Forecast Pro comments now shown as comments) and the final forecast at the time of export. Below the exported forecast is an orange row for entering overrides. The orange overrides row is the only editable row in the grid. The row label includes the name of the override row that will be used when the collaboration sheet is read into the Forecast Pro project (“Excel Collaboration” in the example above). Below the overrides row, the Updated Forecast row shows the forecast with the overrides you have entered.
To enter overrides, simply enter the override value into a cell in the orange override row. You may add, edit or delete a comment for the override using the cell context menu (right click on a cell to view the cell context menu) or the buttons on the custom Forecast Pro tab, as described above in the In Place Collaboration Sheets sub-section. You may also view the About Forecast Pro dialog box by clicking the About Forecast Pro button on the Forecast Pro tab.

