Forecast Pro TRAC only
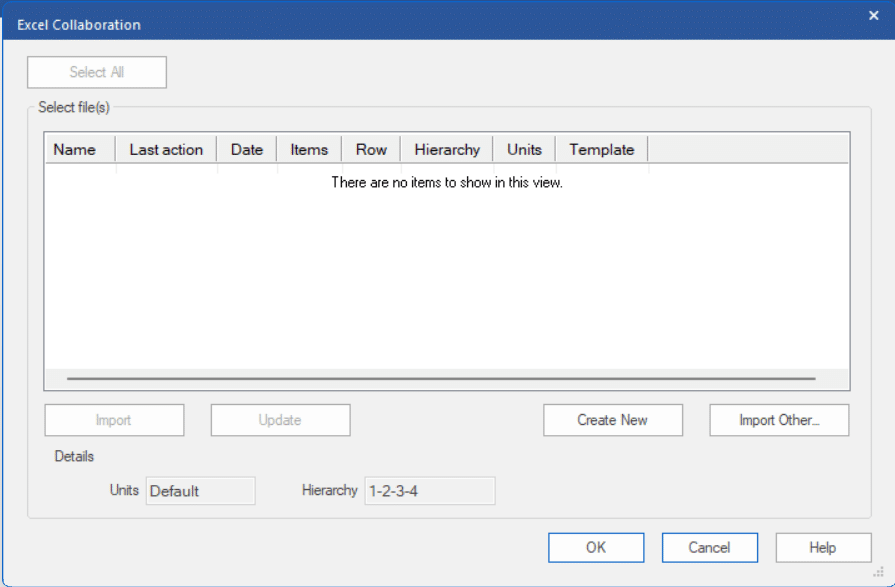
Clicking the Excel Collaboration icon on the Home tab opens the Excel Collaboration Manager. The Excel Collaboration Manager will open to the Export tab.

All collaboration sheets associated with the project will be listed in the Select file(s) to update display. When you first start a project, this list will be blank, and you will probably want to create new sheets. To create and add a file to the list, click the Create New button to open the Create dialog box.

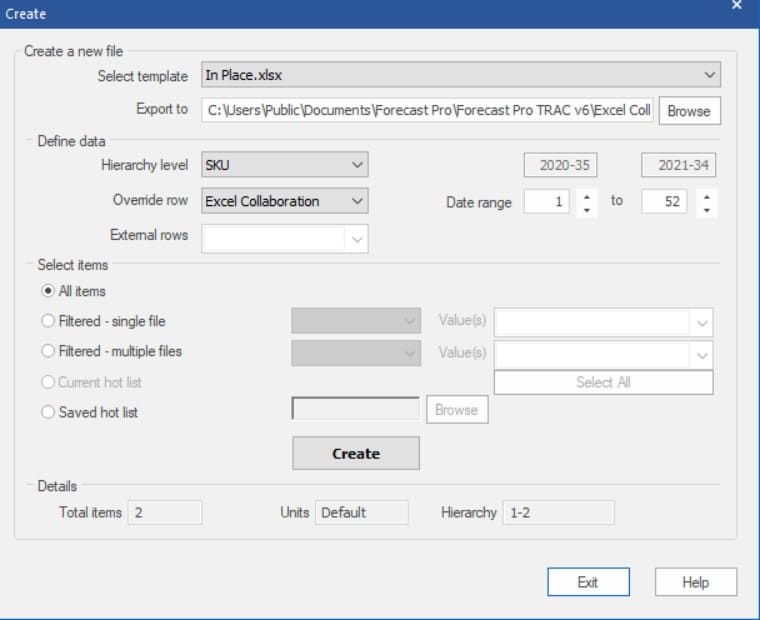
Create a new file
Template drop-down: The first step is to select a Template. There are two available templates for creating Forecast Pro collaboration sheets- In Place and By Selection. The In Place template exports the forecasts for all exported items to a single sheet for editing. The By Selection template displays only one item at a time and includes a selection drop-downs for choosing the item. An example for each template is shown in the Editing Collaboration Sheets in Excel section.
Export to: This text field specifies where you want to save your collaboration sheet. By default, collaboration sheets are saved in “C:\Users\Public\Documents\Forecast Pro\Forecast Pro TRAC v8\Excel Collaboration”.
Define Data
Hierarchy Level: Forecast Pro allows you to make overrides at any level of the hierarchy, but all items exported to a given file must be at the same level of the hierarchy. By default, Forecast Pro selects the lowest hierarchy level in the Hierarchy drop-down. The collaboration sheet is associated with the hierarchy order as defined in the project when the file is created. The hierarchy in the drop-down will reflect the current project hierarchy as well.
Override Row: The Override row drop-down lists all available override rows as well as a row that may not be shown in the override grid, Excel Collaboration. When working with override rows, the override value in the row closest to the final forecast row has the highest precedence over other rows which are closer to the top of the override grid. If there are multiple overrides for the same item and forecast period, the override row that is lowest in the grid is used in the final forecast. The Excel Collaboration row takes precedence over all other override rows and will be created when the Forecast Pro collaboration sheet is imported. If a sales representative uses the Excel Collaboration row, they are guaranteed that the final forecast will integrate their overrides. Excel Collaboration is the default selection.
Date Range: The Date Range spinners are used to tell Forecast Pro how many historical and forecast periods you want included in the Collaboration Worksheet. Historical sales are helpful when determining if a forecast makes sense. If the left spinner shows “-12”, the collaboration worksheet will contain 12 periods of history. The corresponding date is shown directly above the spinner.
External rows: You are also able to export external data rows and calculated rows that you have defined in your project. Select which external rows you want to include in your Excel Collaboration sheet from the External rows drop-down.
Select Items
There are five options for defining the items you want to include in your Excel Collaboration file:
All: Exports all items to the collaboration worksheet.
Filtered – single file: If this option is selected, you must also specify a Filter in the drop-down to the right of Filtered – single file and then select one or more filter values in the Value(s) drop-down. The items with filter values corresponding to your selected value(s) will be exported to a single collaboration worksheet. The Filters drop-down is populated with all filters that you have read in using the Data Manager. You need to have read in at least one filter file to use this option. Please consult Custom Filter Fields.
Filtered – multiple file: If this option is selected, you must also specify a Filter in the drop-down to the right of Filtered – multiple file and then select one or more filter values in the Value(s) drop-down. The Select All button will select all values. The items with filter values corresponding to your selected value(s) will be exported to multiple collaboration worksheets. A separate collaboration worksheet will be created for each selected value using a default naming convention. The Filters drop-down is populated with all filters that you have read in using the Data Manager. You need to have read in at least one filters file to use this option. Please consult Custom Filter Fields.
Current hot list: Export items on the current hot list. This option is only available if you have a hot list currently defined.
Saved hot list: When working with hot lists, you can save a hot list using the Hot list icon on the Export tab or by selecting Save Hot list on the Hot List context menu. These files will contain a list of the items on the hot list. You can select a saved hot list by clicking the browse button and selecting the file.
Create: The Create button is used to generate the collaboration sheet(s) as specified. The collaboration sheet(s) will be created for the current hierarchy order and units. If you have reordered the hierarchy or changed the units after reading in a conversions file, the collaboration sheet(s) will be saved using the current project state, as shown in the details section. If you are using Filtered – multiple files, Forecast Pro will automatically save the files to the folder location defined in the Export to text area and display the exported worksheets in the Select file(s) to update display. In all other cases, you will be prompted to save the file. After you confirm the file save, the new sheet will be listed in the Select file(s) to update display.
Details
Total Items: This is a non-editable text field that displays the total number of items you have selected to export. If there are 0 items selected to export, the Create button will be greyed out.
Units: Forecast Pro will create the Excel Collaboration sheet in the units currently being used in the project. This is a non-editable text field that displays the units which the Excel Collaboration sheet uses.
Hierarchy: Forecast Pro will create the Excel Collaboration sheet in the hierarchy order currently being used in the project. This is a non-editable text field that displays the hierarchy order which the Excel Collaboration sheet uses.
Once you are done, click the Exit button to return to the Excel Collaboration Manager.

