In this section we will learn how to use Forecast Pro’s Project Collaboration capabilities to create smaller Forecast Pro projects which can be shared with other members of your team so they can work with a subset of your data.
Please view Project Collaboration in Forecast Pro for a video overview of Project collaboration. Alternatively, proceed with the written lesson below.
Let’s consider the following example. A company sells their products in three countries—the United States, Canada, and Mexico. They employ three different demand planners, each of whom is responsible for forecasting a specific country. After the demand planners have completed their forecasts, they meet with management to review the forecasts and make any required adjustments.
Project collaboration starts with a single project, the “parent” project, which contains data for all countries. This is the project that is used for final management review. Once the parent project is created, the project owner (likely one of the demand planners) can create a “child” project for each country/demand planner. Each demand planner then generates statistical forecasts, baseline forecasts and overrides for their country’s products. The demand planners can work in parallel. These baseline forecasts and overrides can then be consolidated in the parent project by importing each child project into the parent project. When a child project is imported, the child baseline forecast is assigned as the baseline for each item in the child project and child overrides are applied. At this point management has visibility to all baseline forecasts and overrides made in the child projects and can now review the consolidated forecasts and make any required adjustments.
Note that in this tutorial, each demand planner needs to generate statistical forecasts, so the child projects will need to have forecasting enabled. Project collaboration may also be used without forecasting enabled. If forecasting is not enabled in the child project, simply skip the child project forecasting section of this tutorial.
Please note that you need a Forecaster license to use project collaboration. You may use a Collaborator license to open a child project, but you will not be able to make changes to the baseline forecasts even if forecasting is enabled in the child project. Generating statistical forecasts in a child project requires a Forecaster license.
Creating Child Projects
Start Forecast Pro and create a new project. Click the Data Manager icon on the Home tab to open the Data Manager. Click the Add drop-down on the Historic Data row, select Excel, and select ACME Hardware – Historic Data.xlsx to add it to the Historic Data row. Click the Add drop-down on the Conversions row, select Excel, and select ACME Hardware – Converions.xlsx to add it to the Conversions row. Click on the Read & Forecast button and then on the Exit button to close the Data Manager. Right click on the Navigator to open the Navigator menu and select Expand All.
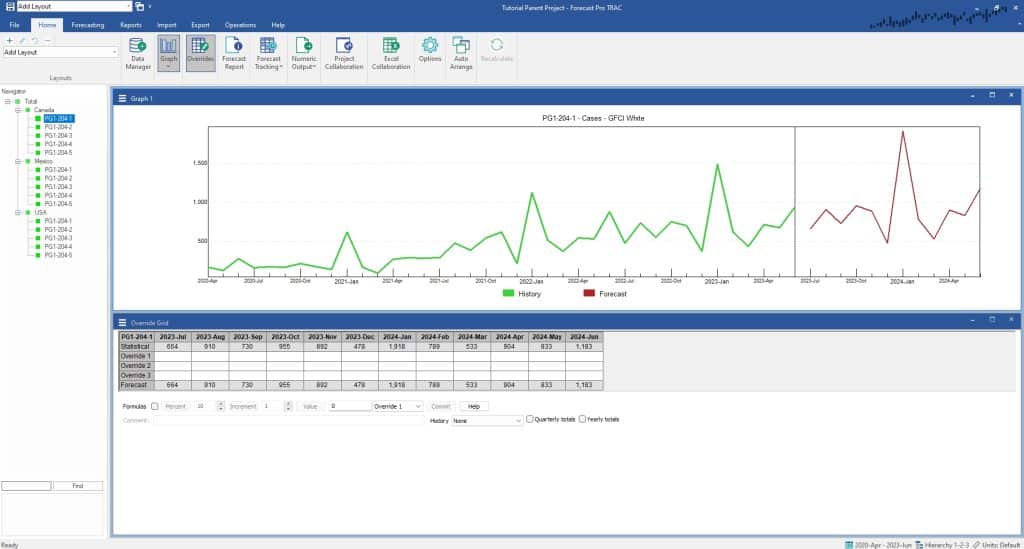
This is the project where we want to consolidate all forecasts and overrides and have management finalize the forecasts for all three countries. Save the project, naming it Tutorial Project Collaboration.
First, we must create a child project for each of the country-based demand planners. Click the Project Collaboration icon on the Home tab to open the Project Collaboration dialog.
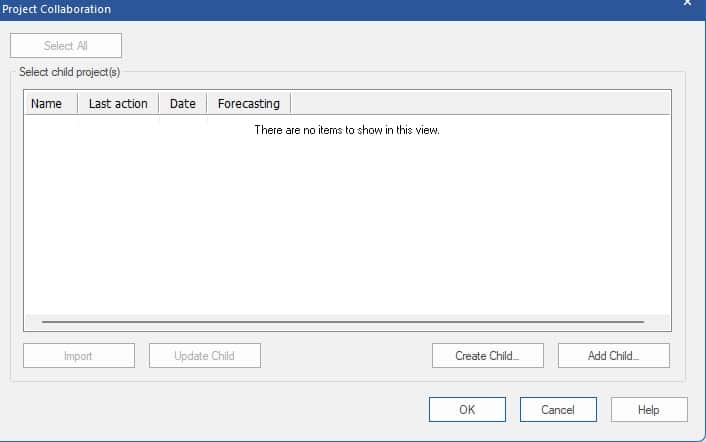
Select child project(s) lists all child projects associated with the project. We have not yet created any child projects, so this list is empty. To create our three child projects, click the Create Child button.
We need our demand forecasters to generate statistical forecasts—check the Enable Forecasting in Child Project checkbox.
The default location for saving child projects is \Forecast Pro\Forecast Pro TRAC v8\Child Projects\ in the Public Documents folder, as shown in the Export to textbox. Change this path if you prefer to save your child projects in a different location.
When creating child projects, we need to specify the level at which we want to split up the parent project. In our case, we want to split the project at the Country level. Make sure that Country is selected in the Hierarchy level drop-down.
Finally, we want to create 3 child projects—one for each country. To do this, select the Multiple projects files radio button and then select each country in the associated drop-down.
Your Create dialog should now look like this:
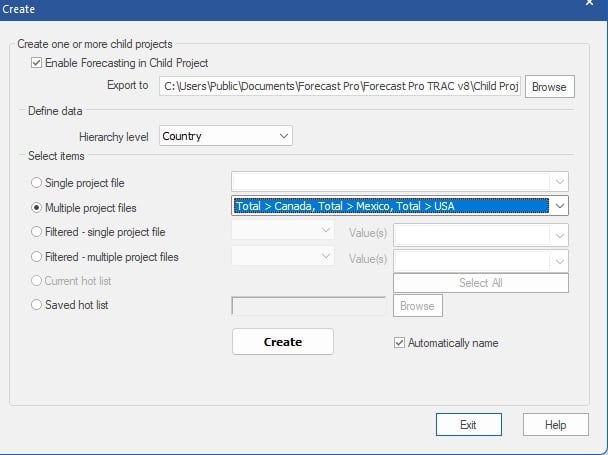
Note that Automatically name is selected. This means that when we create the child projects, Forecast Pro will save projects in the Export to folder with project names based on default naming conventions. Click the Create button.
Once the child projects are finished forecasting and saved, the Create dialog will automatically close. Note that the three child projects are now shown in the Select child project(s) field.
Close the Project Collaboration dialog and save and close your project.
If you look in the folder you exported the files to, you should now see Tutorial Project Collaboration – Total – USA, Tutorial Project Collaboration – Total – Canada and Tutorial Project Collaboration – Total – Mexico. If this were a real forecasting process, the demand planners would now be given access to these projects.
Forecasting in Child Projects
Suppose you are the United States demand planner. Open Tutorial Project Collaboration – Total – USA, right click on the Navigator to open the Navigator menu and select Expand All.
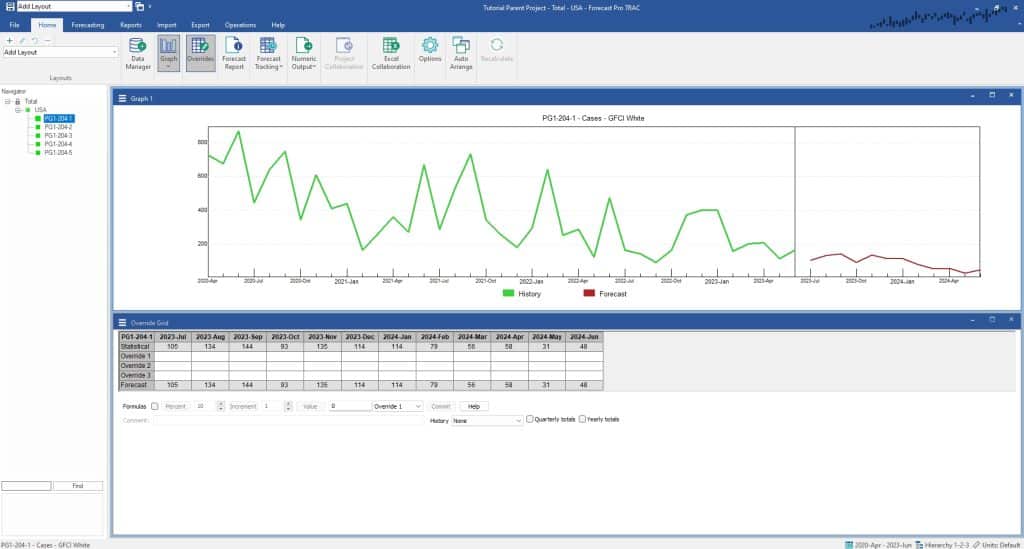
Note that the child project only contains items for the USA. Also notice that the Total icon is now locked. This is because the Total group in Tutorial Project Collaboration – Total – USA only includes the USA items. It is missing items (e.g., Canada and Mexico items) that are included in the parent project’s total. Since the child project’s Total is incomplete, you are unable to forecast or override Total in the child project.
You are now able to customize your USA forecasts. You have access to all available forecasting functionality in your child project. Any data in the parent project (e.g., explanatory variables, helpers, etc.) is available in the child projects. You are also able to add additional data in the Data Manager (except for historic data). Explore the Forecasting Operations tutorials for an overview of how to customize your statistical forecasts.
For the purpose of this tutorial, let’s make just a few simple changes.
Select PG1-204-1 on the Navigator. Open the Forecasting tab and click on the Box-Jenkins icon to apply a Box-Jenkins model. We will continue to use expert selection (the default) for all other items.
Overriding Forecasts in Child Projects
Look at the override grid. Note that since forecasting is enabled, the override grid looks the same as it does for any Forecast Pro project. If your child project did not have forecasting enabled, the first line of the grid (the baseline row) would be Parent Baseline Forecast.
Open the Override Grid Settings from the hamburger menu and click on the Add or Remove button.
Note that the parent project’s converted rows (Boxes, Dollars, Gross and Pallets) are available. You may view the converted forecasts in the override grid, but you are not able to convert the entire project or reorder the hierarchy in a child project. Click on Dollars to also view the forecast in dollars. Click OK to close the Add or Remove dialog and then click OK to close the Override Grid Settings.
Right click on the Override 1 label and select Edit Row Label. Rename the row “Demand Planning.” Now select the February cell and enter “=1.2*BASE”. Enter a comment (e.g., “Increased for promotion”) and click the Commit button.
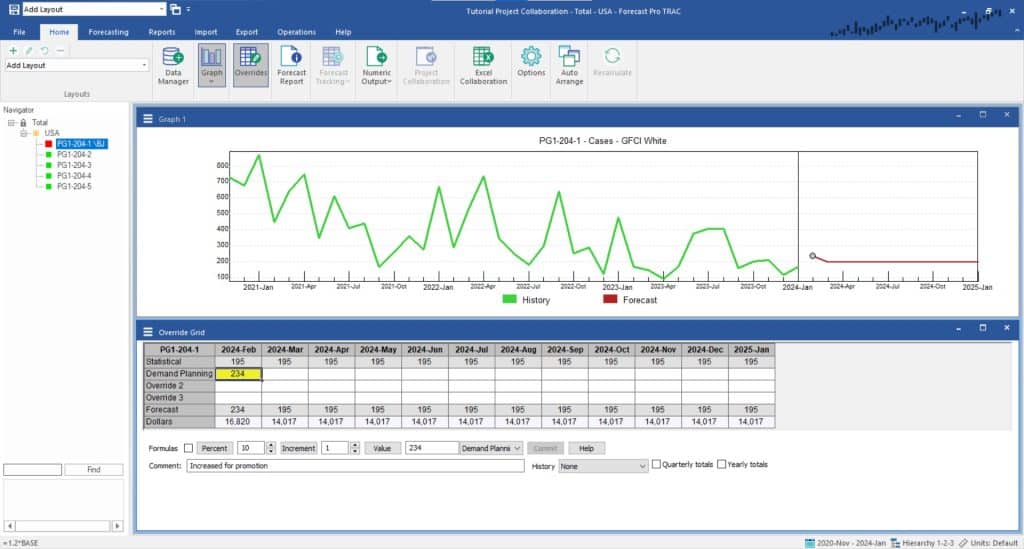
Save and close the child project.
Importing Child Projects
Open the parent project, Tutorial Project Collaboration, and then open the Project Collaboration dialog.
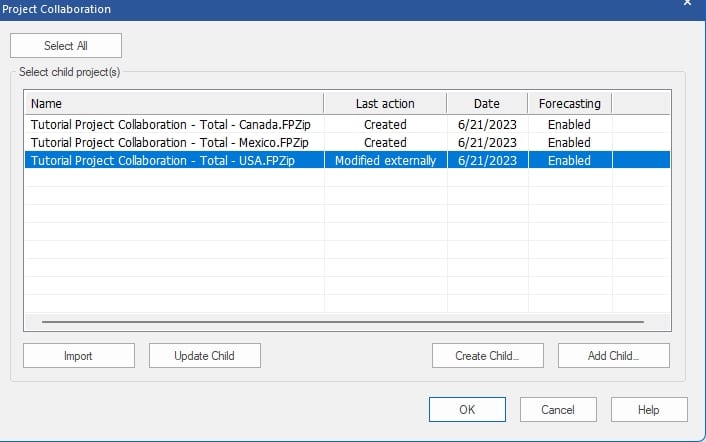
Select child project(s) lists the three child projects and shows that Tutorial Project Collaboration – Total – USA has been modified. Select Tutorial Project Collaboration – Total – USA, click Import and click OK to close the Project Collaboration dialog.
Select Total>USA> PG1-204-1 on the Navigator.
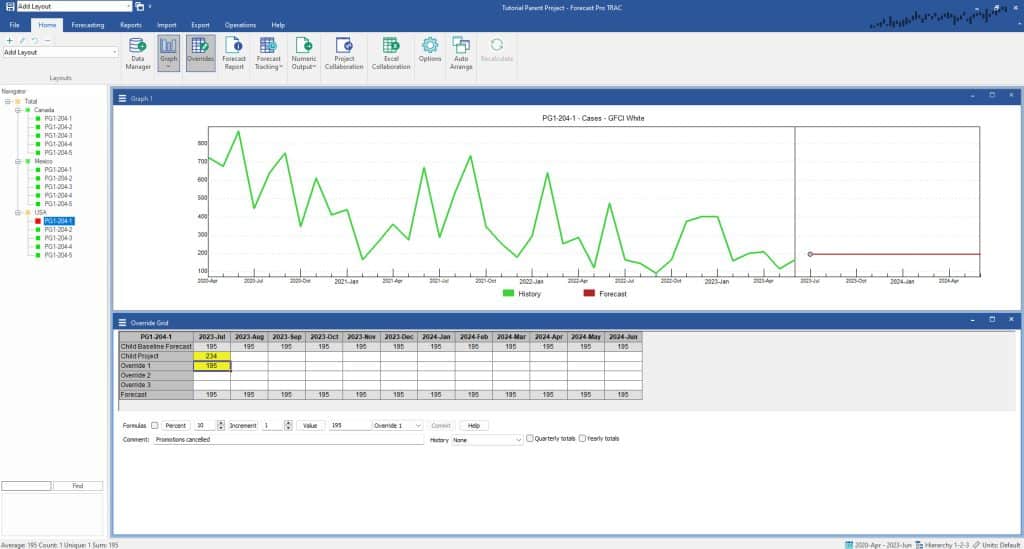
Note that the baseline is now Child Baseline Forecast and that there is now a row called Child Project right below the baseline row. When we imported the child project overrides, all child project overrides are consolidated in a single row that is comprised of the applied overrides (the lowest override row). Forecast Pro also imports the comments associated with the applied cells.
If forecasting was not enabled, the baseline forecast would still be shown as Statistical the parent statistical.
Suppose during the management review, the USA manager mentions that the promotion has been cancelled. Rename the Override 1 row to Management. Select the February cell and enter the baseline forecast. You may do this by entering an equal, selecting the February Child Project Baseline forecast cell and then enter to generate the formula “=BASE”. Enter a comment in the February Management row cell (e.g., “Promotion cancelled”).
In a typical forecast process, all the child projects would be modified and imported, consolidating all child project changes in the parent project. Management would then do a final review for all items in the project.
Updating Child Projects
Going forward, the demand planners will likely want to start each forecasting cycle where they left off. Instead of re-creating child projects each forecasting cycle, you can use Forecast Pro’s updating functionality to update the child projects with the parent project’s updated data. To update the child projects, open the Project Collaboration dialog, select the child projects to update, and click Update. Your projects have now been updated with the current parent project data and can now be distributed to the demand planners.
This concludes Using Project Collaboration.

