Forecast Pro TRAC only
Overview
Mapped history can be defined using product mappings with existing items in your project or as time series values that are imported from a file. Each of these approaches is described below.
Product mapping is used to assign the history from one or more items (the Map from items) to another (the Map to item). If there is a single Map from item, the Map to item’s forecast history is equal to the Map from items’ history plus the Map to item’s history.
Map to Forecast History = Map from history + Map to history
In this case, the mapped history is the Map from history. If mapped history exists for any of the Map from items, Forecast Pro will map the forecast history for those items instead of the observed history.
When you create a product mapping, Forecast Pro will use the Map from’s forecast history as it exists at that point in time. If the forecast history for the Map from item changes, the forecast history for the Map to item will not automatically reflect that change. If you want to update the Map to item’s forecast history to reflect that change, you will need to explicitly redefine your product mapping or mapped history.
You may define product mappings interactively or by importing a product mapping file. Interactively creating product mappings will help you understand how product mapping works and is convenient if you don’t have many items to map. However, using product mapping files and importing them with the Data Manager is a more efficient way to assign product mappings and provides an easy way to refresh your product mappings with updated histories.
Interactive Product Mapping
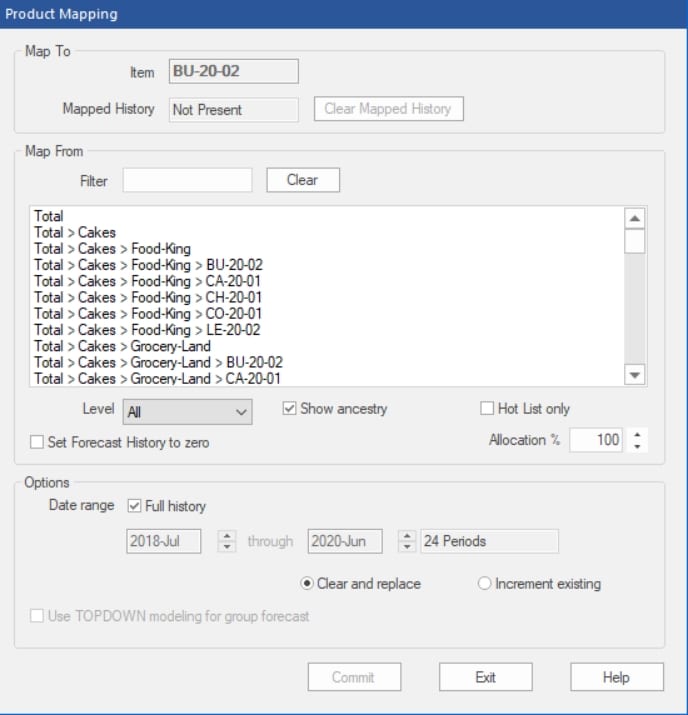
To define product mappings interactively, click the Product Mapping icon to open the Product Mapping dialog box. When you open the Product Mapping dialog box, the primary Graph view will open as well, if it is not already open.

Map To:
Item: This non-editable text box shows the item you are assigning mapped history to. The item is selected using the Navigator. Please note that you can change the item selected on the Navigator without closing the Product Mapping dialog box.
Mapped history: This non-editable text box shows if mapped history currently exists for the selected item. If the Mapped History field states mapped history is “Present”, the forecast history is currently different from the observed history. If the Mapped History field states mapped history is “Not Present,” the actual history is currently being used as the forecast history.
Clear Mapped History: This button removes any existing mapped history from the selected item. After clearing mapped history, the Mapped History field will show “Not Present”, and Forecast Pro will use the observed history for forecasting.
Map From:
The Map From section is used to select the items in the project whose forecast history you want to use as mapped history for the item selected on the Navigator (shown as the Map to item). You may select one or more items in the display. If mapped history does not exist for a Map from item, Forecast Pro will use the actual history. Note that as you select items, the graph updates to include a yellow area to show the forecast history that will be used for the Map to item if you commit to the current selection.
Filter: Use this text box to Filter the display to include only items that contain the entered text.
Clear: This button clears the Filter.
Level: Use this drop-down to only display items in the selected hierarchy level.
Show ancestry: If checked, the display will include attribute values for all attribute levels when displaying an item. If unchecked, the display will only include the attribute value for the level at which the item is defined.
Hot List only: If checked, the display will only include items that are present in the Hot List
Allocation: The Allocation spinner is used to specify what percentage of the Map from items histories should be used. For example, if the Allocation is set to 50%
Forecast History for Map to item = 0.5 x Forecast History of Map from item + Actual History of Map to item
Set Forecast History to zero: If checked, Forecast Pro will set the forecast history for the selected Map from items to zero. This will essentially ignore the observed history, and the forecast will be set to zero. This can also be achieved by discontinuing the item or selecting Set to zero on the Discontinue icon drop-down on the Forecasting tab.
If you are working in End-item only mode, setting an item’s forecast history to zero can be used to avoid double counting in group level forecast histories. For example, suppose both the Map from and Map to items are members of the same group. When you map the Map from item to the Map to item without setting the Map from item’s forecast history to zero, the Map from item’s forecast history will be included in the aggregated group level forecast history twice- once when the Map from item’s forecast history is included in the aggregation and again when the Map to item’s forecast history is included. Using this option will apply a modifier \SET_FH_TO_ZERO to the Map from item, whose forecast history will become zero to avoid double counting in this way.
Options:
Date Range: If the Full history checkbox is checked, Forecast Pro will map the Map from item’s entire history to the Map to item. If the Full history checkbox is unchecked, you may use the date spinners to specify beginning and ending dates for the mapped history.
Clear and Replace and Increment Existing Forecast History: If there is already mapped history for the Map to item, you will need to decide how you want to treat the existing mapped history. If you select Clear and Replace, Forecast Pro will delete any existing mapped history and replace it with the current selection. If you select Increment Existing, Forecast Pro will keep any existing mapped history and increment it with the mapped history for the current selection.
To illustrate, suppose you have already mapped item B to item A and neither had existing mapped history, so
Item A’s Forecast History = Item A’s history + Item B’s history
If you are reading in a new product mapping that maps item X to item A, choosing Increment Existing instructs Forecast Pro to keep the mapped history from Item B in Item A’s forecast history, so
Item A’s Forecast History = Item A’s history + Item B’s history+ Item X’s history
If you select Clear and Replace, Forecast Pro will clear the existing mapping for Item B before applying the new one, so
Item A’s Forecast History = Item A’s history + Item X’s history
If there is no existing mapped history for the Map to item, both options will produce the same forecast history for the Map to item.
Use TOPDOWN modeling for group forecast: If checked, Forecast Pro will apply a \TOPDOWN modifier to the Map To item. This option is only available in All levels mode and when a group item is selected on the Navigator. If you are in All levels mode and assigning mapped history at a group level, it is likely that you are doing so because you want to be modeling at that level. The \TOPDPOWN modifier instructs Forecast Pro to use the forecast history for the selected group item to generate forecasts and then to disaggregate that group level forecast to the sub-groups and end-items that comprise the selected group item. Please see Group Level (Reconciliation Modifiers) for more details on Top-down modeling.
Commit: When you click the Commit button, you will see the graph and override views update to display Forecast History. You will also see that the Navigator icon for the selected item is updated to ![]() . This icon indicates that there is mapped history for the item, so the forecast history is now different from the observed history. If you open the Item Report view, you will see that the Mapped History entry is “Yes.”
. This icon indicates that there is mapped history for the item, so the forecast history is now different from the observed history. If you open the Item Report view, you will see that the Mapped History entry is “Yes.”
You will also see that you have one or more new entries in the Mapping Report. The Mapping Report keeps track of all existing mapped histories in your project. A description of the Mapping Report is below.
Using Files to Define Mapped History
Product Mapping Files
All the functionality available in the Product Mapping dialog is also available in product mapping files. Setting Up Your Optional Data: Product Mapping Files provides details on how to set up a product mapping file.
You may export a product mapping file that includes all or selected product mappings in your project. When you define a product mapping, the data is not automatically updated each month with new data assigned to the Map from item. The mapped history is essentially a snapshot of the data currently available in the project. If you have created product mappings interactively and will need to refresh them with new data in the next forecast period, you can export the product mapping file and then import that file using the Data Manager in the next forecasting period. Exporting a product mapping file is also a good way to understand the required file formats.
You can export a product mapping file by clicking the Product Mapping File icon on the Export tab.
Mapped History Files
At times, you may find that the item that you want to Map from is not in your historic data. For example, you may want to map from a discontinued item that has been removed from your historic data file. If so, you may use a mapped history file to import the values that you want to map to an item in your project.
To read in mapped history as time series values, you must import a mapped history file. The forecast history for the Map to item will be the mapped values assigned to that item in the mapped history file plus the Map to item’s history in the historic data file. The required formats are described in Setting Up Your Optional Data: Mapped History Files.
You may also export a mapped history file for selected items.by clicking the Mapped History File icon on the Export tab.
Importing Product Mapping and Mapped History Files
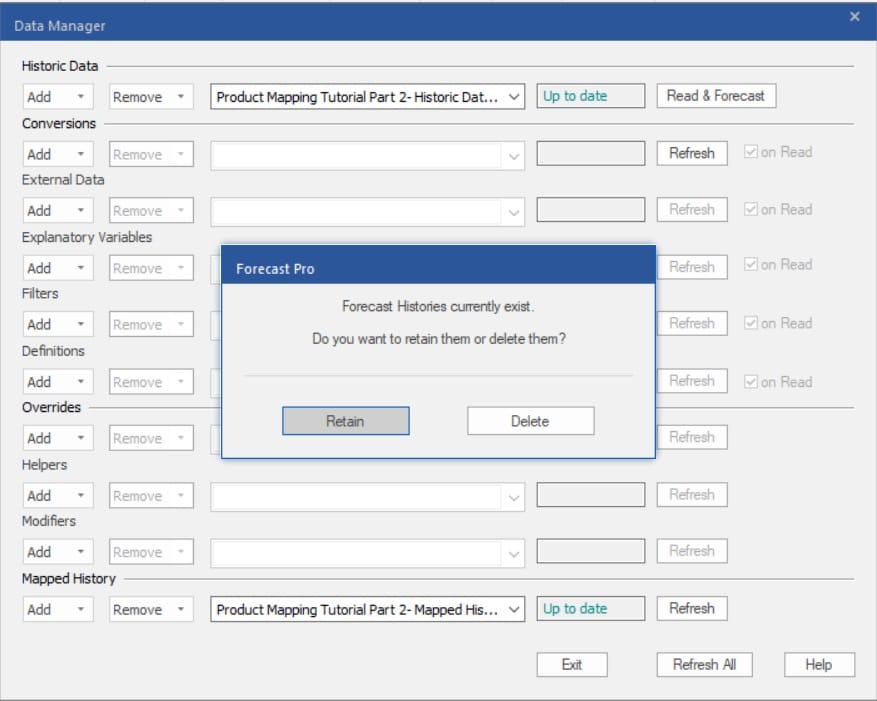
When reading mapping files, Forecast Pro may need direction about how to reconcile existing mapped histories with the new ones you are importing. If there is existing mapped history in your project, you will be prompted with a dialog asking if you want to retain or delete existing mapped histories.
Product mapping files and mapped history files are both read in from the Mapping History row in the Data Manager. See Using the Data Manager for details.

Deleting mapped histories will clear existing mapped histories for all items before reading in the mapped history and/or product mapping files.
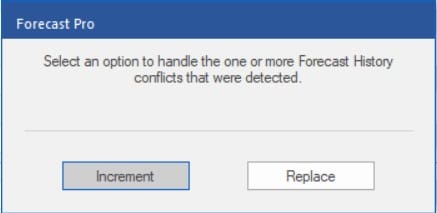
If you retain existing mapped histories, Forecast Pro will need further direction about how to handle conflicts and you will see an additional prompt.

Suppose you have already mapped item B to item A, so
Item A’s Forecast History = Item A’s history + Item B’s Forecast History
If you are reading in a new product mapping that maps item X to item A, choosing Increment instructs Forecast Pro to keep existing mapped history in Item A’s forecast history, so
Item A’s Forecast History = Item A’s history + Item B’s Forecast History +Item X’s Forecast History
If you select Replace, Forecast Pro will clear the existing mapped history from Item B before applying the new one, so
Item A’s Forecast History = Item A’s history +Item X’s history
Note that your selection will apply to all items in your mapping files.
Once you select the Refresh button on the Mapping Histories row of the Data Manager and respond to the prompts, you will be able to see the resulting forecast histories in the Mapping Report, the Item Report, the Graph and the Override view. You will also see that items with mapped histories now have the ![]() icon on the Navigator.
icon on the Navigator.

